> ## Documentation Index
> Fetch the complete documentation index at: https://docs.ravenna.ai/llms.txt
> Use this file to discover all available pages before exploring further.
# Applications
> Build an application catalog in Ravenna with access levels, approval workflows, and identity provider mappings to govern access requests.
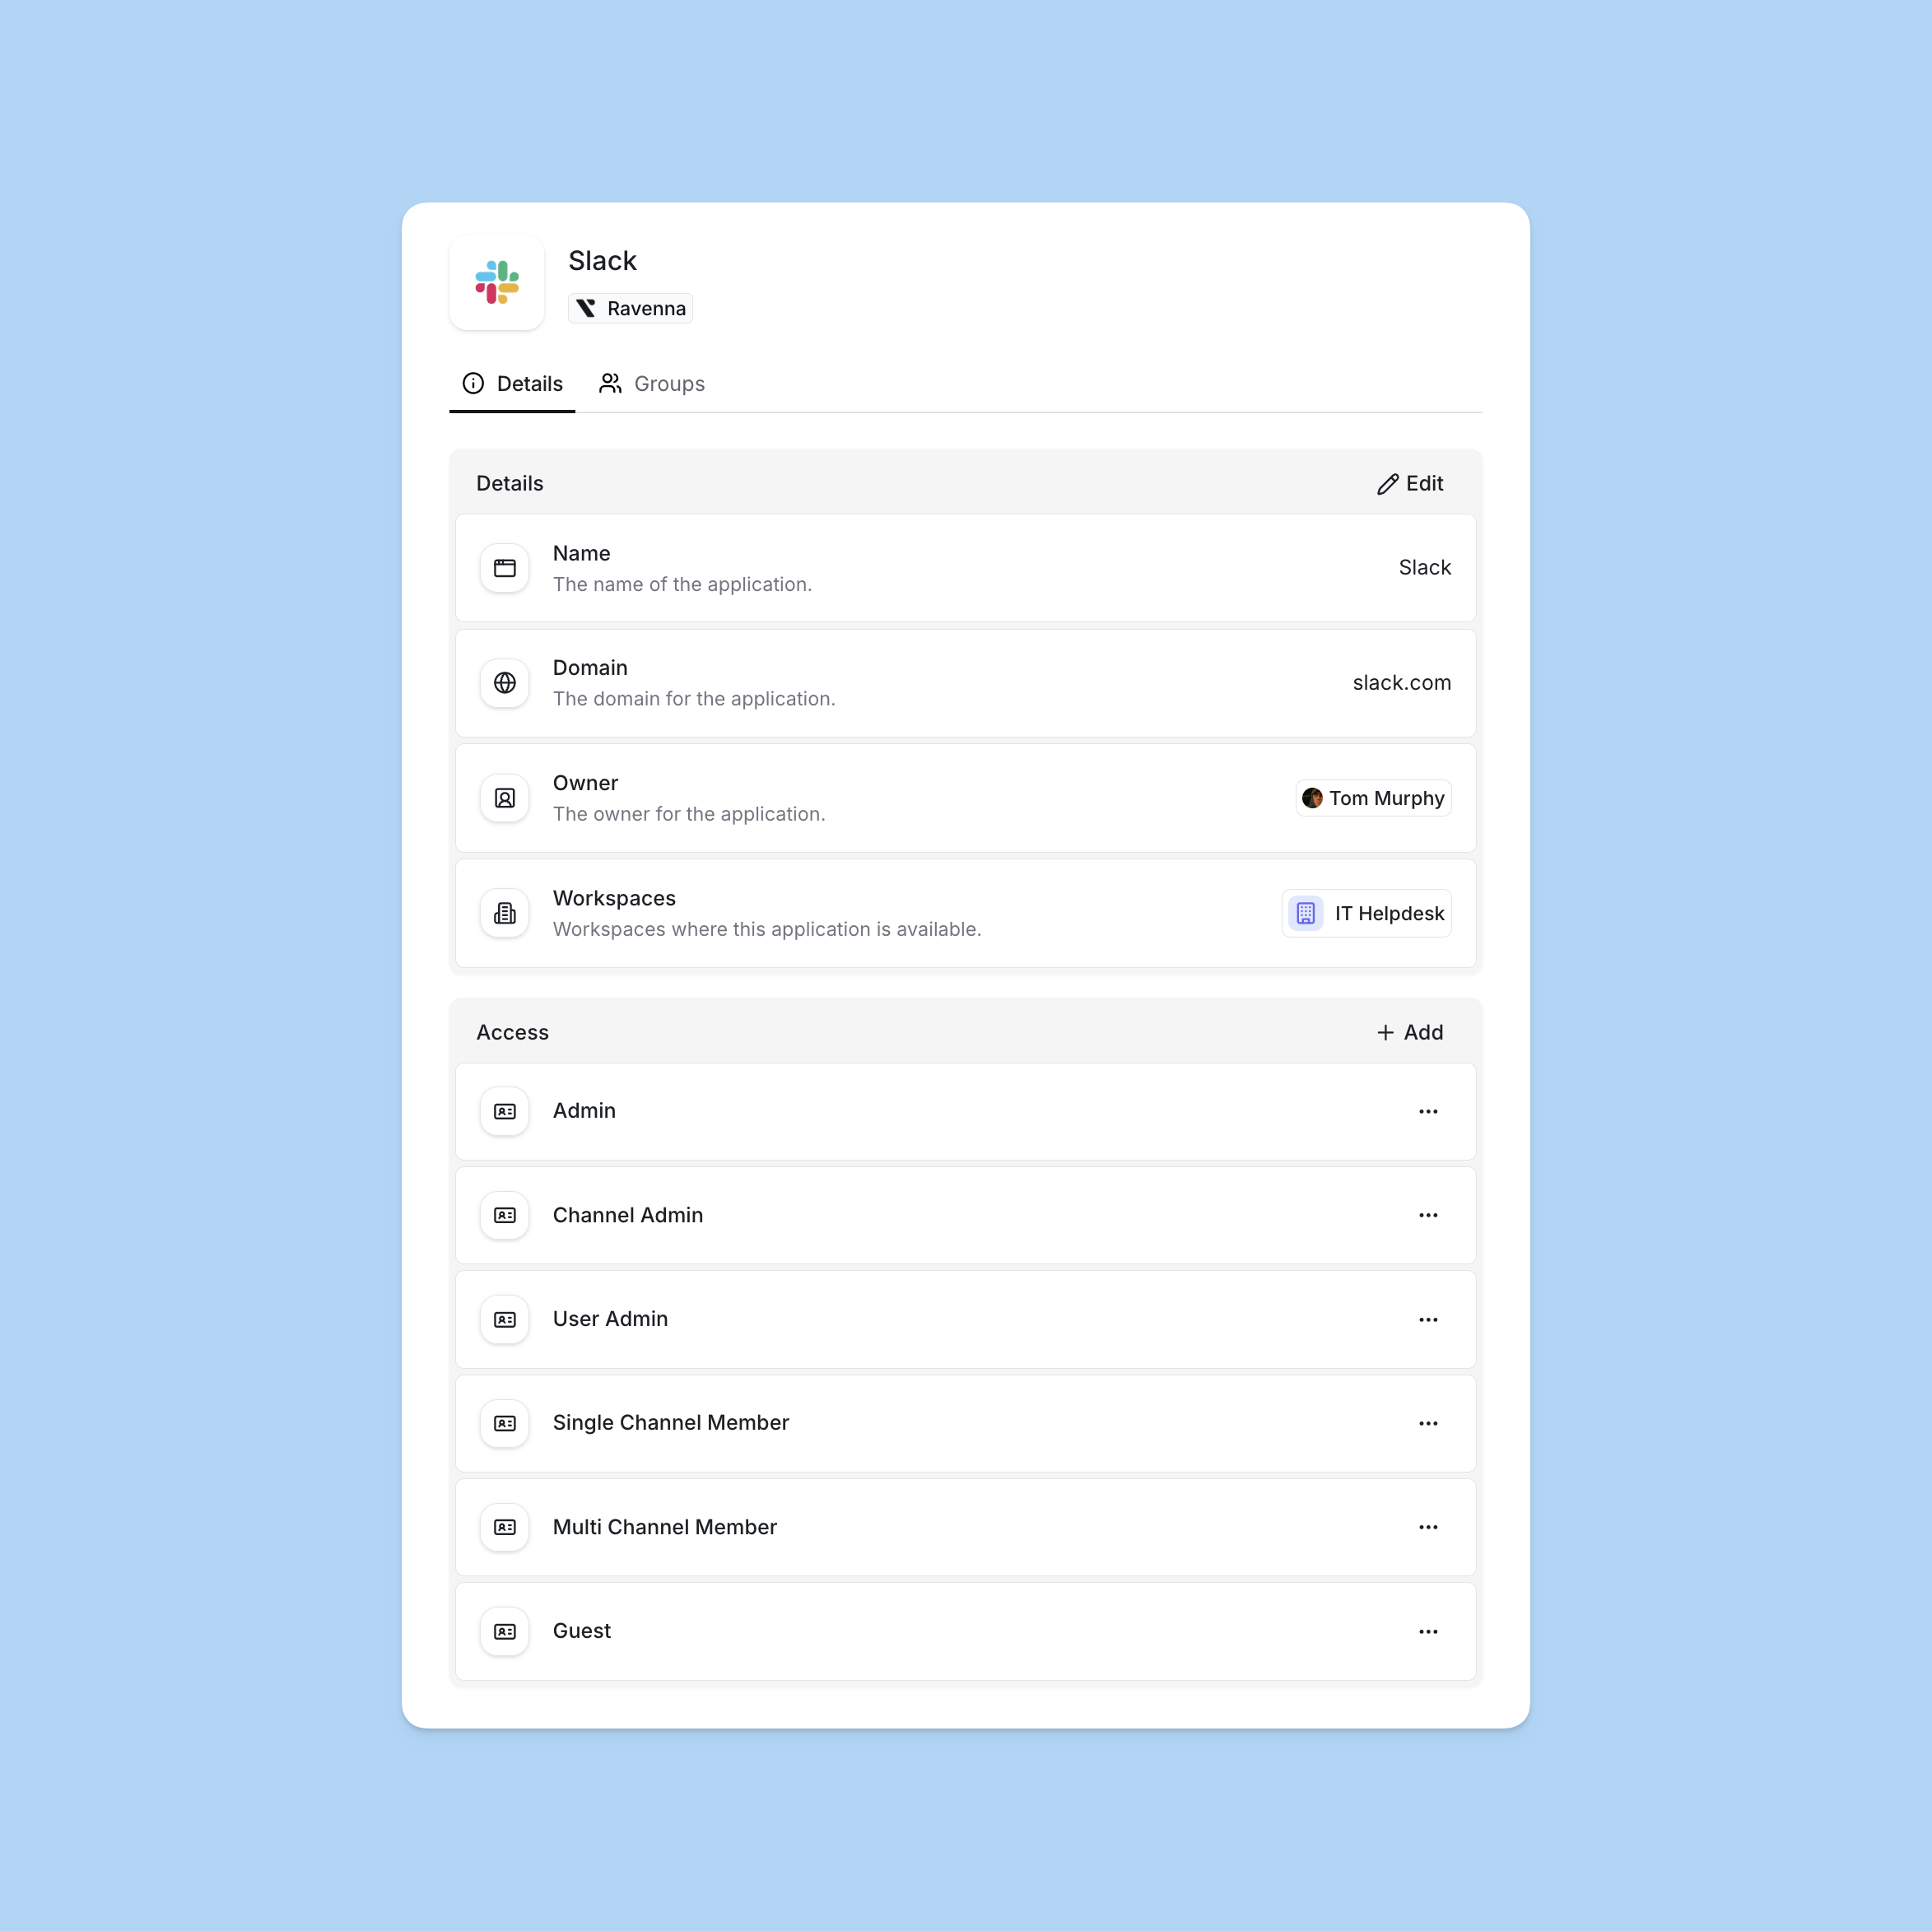 Applications represent the external tools and services your organization uses. By defining applications in Ravenna with their corresponding access levels, you create a structured catalog that supports automated access request workflows and maintains proper governance controls.
***
## What applications provide
Centralized inventory of tools and systems your organization uses
Different permission tiers for each application
Control who approves requests for each access level
Map access levels to groups in Okta or Google Workspace
***
## Setting up applications
Create application entries to represent the tools and services your organization uses.
Go to **Settings** > **Applications** in the left sidebar.
Click **Add Application** to create a new application entry.
Provide the application details:
* **Name**: Display name for the application
* **Domain**: The application's web domain (optional)
* **Details**: Rich text notes about the application (optional). These details appear in hover cards when users view the application in ticket custom fields.
* **Owner**: User or user group responsible for managing this application. Selecting a group lets the entire group act as the owner for routing and fallback purposes.
* **Approver**: User or user group responsible for approving access requests for this application. Used by access levels and approval templates that route to the "Application Approver" role. When a group is selected, every member of the group is treated as an approver. If no approver is set, the application owner is used as a fallback.
* **Post Provisioning Message**: Optional rich text message sent to the requester after access has been granted. See [Post provisioning message](#post-provisioning-message) for details.
* **Workspaces**: Select which workspaces can surface this application via request forms
Add access levels to define the different permission tiers available for this application.
Click **Save** to create the application.
If your organization uses Okta or Google Workspace, you can automatically sync applications instead of creating them manually. See the [Okta integration guide](/integrations/okta/overview) or [Google Workspace integration guide](/integrations/google-workspace/overview) to set up automatic application syncing.
***
## Customizing synced application names
Applications synced from identity providers (Okta, Google Workspace, Microsoft Entra ID) use the integration's application name by default. You can set a custom display name to make applications easier to identify for your users.
Go to **Settings** > **Applications** and select the synced application you want to rename.
Click the **Edit** button to open the application settings.
Enter your preferred name in the **Display Name** field. This overrides the integration name shown to users.
Click **Save** to apply the new display name.
When a display name is set:
* The application appears as **Display Name (Original Name)** throughout the platform
* The original integration name is preserved for reference and syncing
* Clearing the display name reverts to showing only the original name
The original application name remains unchanged and continues to sync with your identity provider. Only the display name shown to users is affected.
***
## Post provisioning message
Set a custom message that's sent to the requester on the ticket once their access has been provisioned. Use it to share login instructions, links to documentation, onboarding resources, or any other context specific to that application.
When set, the post provisioning message replaces the default confirmation text on the ticket for both fully provisioned and partially provisioned access requests. When left blank, Ravenna uses the default messages.
### When to use it
Point users to a single sign-on URL, account setup link, or first-time login steps
Direct users to internal guides, training videos, or runbooks for the application
Note any post-provisioning steps the requester needs to take, such as installing a client or accepting an invite email
Tell requesters who to reach out to with questions about the application
### Configure the message
Go to **Settings** > **Applications** and select the application you want to edit.
In the **Post Provisioning Message** field, enter the rich text message you want requesters to see after access is granted. You can include formatted text, links, and lists.
Click **Save** to apply your changes. The message is used for all future access requests against this application.
### Default messages
If no post provisioning message is configured, Ravenna posts one of the following on the ticket:
| Outcome | Default message |
| ---------------------------- | ------------------------------------------------------------------------------------------------------------------------- |
| Access fully provisioned | Your request has been approved and your access has been granted. |
| Access partially provisioned | Your request has been approved, and we skipped provisioning some or all entitlements that you may already have access to. |
The post provisioning message is sent only after access is successfully provisioned (or partially provisioned). It isn't sent when a request is rejected or when provisioning fails.
***
## Exporting applications
Export your application catalog to a CSV file for reporting, audits, or backup. The export mirrors the list you currently see in **Settings** > **Applications**, so any search, sort, or filter you apply is reflected in the file.
### When to export
Share a snapshot of your application catalog with auditors or security reviewers
Build reports outside Ravenna using spreadsheet or BI tooling
Review ownership, approvers, and access levels across applications in bulk
Keep an offline record of your catalog before large changes
### Export the catalog
Go to **Settings** > **Applications**.
Apply any search, sort, or filters you want included. Only the applications currently visible in the table are exported.
Click **Export** in the toolbar. The CSV downloads to your browser as `applications-export-.csv`.
### What's included
Each row in the CSV represents one application. The export resolves user, group, workspace, and access-level references to human-readable names.
| Column | Description |
| ----------------------- | ---------------------------------------------------------------------------------------- |
| **Name** | The application's name |
| **Display Name** | The custom display name, if set |
| **Domain** | The application's web domain |
| **Status** | `Active` or `Archived` |
| **Source** | The integration the application is synced from, or `Ravenna` if created manually |
| **Provisioning Method** | How access is provisioned for the application |
| **Owner** | The user or user group that owns the application |
| **Approver** | The user or user group that approves access requests, or the owner if no approver is set |
| **Workspaces** | Workspaces the application is surfaced in |
| **Access Levels** | Comma-separated list of access levels defined on the application |
| **Active Entitlements** | Count of currently provisioned entitlements |
| **Created At** | When the application was created |
| **Archived At** | When the application was archived, if applicable |
Exports are capped at 10,000 applications per file. Use filters to narrow the list if your catalog is larger than that.
***
## Archiving applications
Archive applications you no longer want users to request access to without losing their configuration or breaking historical tickets. Archived applications are hidden from request forms and the application catalog by default, but their access levels and approval history remain intact for audit purposes.
### When to archive
The application is being retired and you do not want new access requests
A new tool has replaced this one but you need to keep historical records
The application is only used during specific periods and should be hidden between cycles
The application was created in error or is no longer relevant to your catalog
### Archive an application
Go to **Settings** > **Applications** and select the application you want to archive.
Use the **Archive** action in the application's details to archive it. A confirmation appears before the application is archived.
You can also archive multiple applications at once. From **Settings** > **Applications**, select the applications you want to archive and use the **Archive** bulk action.
### Unarchive an application
From **Settings** > **Applications**, add a status filter for **Archived** to display archived applications. Archived applications are hidden by default.
Select the archived application you want to restore.
Use the **Unarchive** action to restore the application to active status.
To unarchive multiple applications at once, filter by **Archived** status, select the applications, and use the **Unarchive** bulk action.
### Status and visibility
| Status | Visible in request forms | Visible in applications table | Allowed transitions |
| ------------ | ------------------------ | ----------------------------------------------- | ------------------- |
| **Active** | Yes | Yes | Active -> Archived |
| **Archived** | No | Yes (hidden by default, requires status filter) | Archived -> Active |
A color-coded **Archived** badge appears on the application row so you can identify archived applications at a glance.
Archiving an application does not revoke any access that has already been provisioned through it. Archived applications stop appearing in new request forms, but existing tickets, access levels, and identity provider mappings are preserved. To revoke previously granted access, handle the deprovisioning separately in your identity provider.
While an application is archived, Ravenna blocks changes to its access levels and access requests. Creating or unarchiving access levels, and submitting, approving, rejecting, or extending access requests tied to an archived application all fail with an `APPLICATION_NOT_ACTIVE` error until the application is unarchived.
***
## Deleting applications
Delete an application when you want to permanently remove it from your catalog. Unlike archiving, deletion is irreversible and removes the application from Ravenna entirely.
Deletion is permanent and cannot be undone. If you need to keep historical records, audit trails, or the option to restore the application later, [archive it](#archiving-applications) instead.
### When to delete versus archive
The application was created in error, contains test data, or has no historical tickets or approvals you need to retain
The application is being retired but you want to preserve its access levels, approval history, and ticket references for audit purposes
### Delete an application
Go to **Settings** > **Applications** and select the application you want to delete.
Use the **Delete** action in the application's details. A confirmation dialog appears before the application is permanently removed.
Confirm the deletion to remove the application, its access levels, and its identity provider mappings from Ravenna.
Deleting an application does not revoke any access that has already been provisioned through it. To revoke previously granted access, handle the deprovisioning separately in your identity provider.
***
## Access levels
Access levels define the different permission tiers available within an application. Each access level represents a specific set of capabilities users can be granted.
### Why use access levels?
Access levels help organizations implement least-privilege access by allowing users to request only the permissions they need for their role. This reduces security risk while maintaining operational efficiency.
Define levels that match how your organization actually uses each application
Grant only the access users need for their specific role
Users select specific levels, reducing approval back-and-forth
Maintain clear records of what access each user has
### Managing access levels
Access levels have a dedicated **Access Levels** tab on the application details page. Click any row in the table to edit that access level inline.
### Creating access levels
Go to **Settings** > **Applications**, select an application, and open the **Access Levels** tab.
Click **Add Access Level** to create a new permission tier.
Provide:
* **Name**: Clear name indicating what this level grants (e.g., "Admin", "Editor", "Viewer")
* **Description**: Detailed explanation of what permissions this level includes
* **Assignment strategy**: How approvers are assigned when users request this level
* **Approvers**: Who can approve requests for this access level
If using an identity provider integration, map the access level to the corresponding user group for automated provisioning.
Learn about [user groups](/documentation/platform/groups) including synced groups from identity providers
### Example access level structure
Access levels should reflect how your organization actually uses each application. Here's an example for Slack:
| Access Level | Description |
| --------------- | ---------------------------------------------------- |
| Admin | Full admin capabilities including workspace settings |
| User Admin | User administration without workspace configuration |
| Channel Manager | Create, edit, delete, and manage channels |
| Member | Standard user without admin capabilities |
Structure access levels based on actual usage patterns in your organization, not theoretical permission models.
### Archiving access levels
Archive access levels you no longer want users to request without losing their configuration or breaking historical tickets. Archived access levels are hidden from request forms by default, but their approval history and identity provider mappings remain intact for audit purposes.
**When to archive an access level:**
* A permission tier has been deprecated but historical requests should be preserved
* You are restructuring an application's permissions and need to retire old levels
* A level was created in error and should be hidden from new requests
* A level only applies during specific periods and should be hidden between cycles
Go to **Settings** > **Applications**, select the application, and open the **Access Levels** tab.
Select the access level row and use the **Archive** action. To archive several at once, select multiple rows and use the **Archive** bulk action.
To restore archived access levels, filter the table by **Archived** status, select the access levels you want to restore, and use the **Unarchive** action. Use the **Unarchive** bulk action to restore many access levels in a single step.
Archiving an access level does not revoke access already granted through it. Existing tickets, approval history, and identity provider mappings are preserved. To revoke previously granted access, handle the deprovisioning separately in your identity provider.
***
## Assignment strategies
Assignment strategies control how approvers are assigned to access request tickets. Configure different strategies for different access levels based on risk and organizational requirements.
Automatically approves requests without human intervention. The system bot is assigned as the approver and the request is immediately approved.
**When to use:**
* Low-risk applications that don't require oversight
* Self-service applications with built-in approval mechanisms
* Testing or development environments
* Applications where immediate access is acceptable
**Behavior:**
* Request is approved immediately upon submission
* System bot is recorded as the approver
* No waiting period or manual review required
Assigns all specified approvers to the ticket. Any one of them can approve the request.
**When to use:**
* Multiple people are qualified to approve
* You want the fastest response from a pool of approvers
* Cross-functional teams where any member can approve
**Behavior:**
* All approvers in the list are assigned to the ticket
* Any single approver can approve the request
* First approval completes the approval step
Distributes approval requests evenly across the approver pool. Only one approver is assigned per request.
**When to use:**
* Balancing approval workload across team members
* Applications with multiple qualified approvers
* Avoiding bottlenecks from single points of approval
* Ensuring fair distribution of approval responsibilities
**Behavior:**
* Automatically tracks and rotates through approvers
* Assigns the next approver in the sequence
* Only one approver is assigned per request
* Ensures fair distribution across subsequent requests
Configure different assignment strategies for different access levels within the same application. For example, Admin access might use "All" to assign multiple approvers while Member access uses "Auto" for immediate approval.
***
## Identity provider integration
Map access levels to groups in your identity provider for automated provisioning after approval. When a workflow provisions access, it can automatically add users to the appropriate groups in Okta or Google Workspace.
### Okta
Connect your Okta integration and map access levels to Okta groups. After approval, workflows can automatically assign users to applications or add them to groups.
**How it works:**
1. In the Okta integration settings, connect your Okta organization
2. When creating an access level, select the corresponding Okta group from the dropdown
3. In your workflow, use Okta actions to provision access after approval:
* **Add Users to Application**: Directly assign users to Okta applications
* **Add Users to Group**: Add users to Okta groups that grant application access
**Configuration steps:**
Navigate to **Settings** > **Integrations** and configure your Okta connection.
When creating access levels in applications, select the corresponding Okta group from the dropdown menu.
In your access request workflows, add Okta actions after approval to automatically provision access.
Learn about [Okta integration](/integrations/okta/overview) and automated provisioning
### Google Workspace
Connect your Google Workspace integration and map access levels to Google Groups. After approval, workflows can automatically add users to the mapped groups.
**How it works:**
1. In the Google Workspace integration settings, connect your workspace
2. When creating an access level, select the corresponding Google Group from the dropdown
3. In your workflow, use Google Workspace actions to provision access after approval:
* **Add Users to Group**: Add users to Google Groups that grant application access
* **Create Email Alias**: Create email aliases for role-based access
**Configuration steps:**
Navigate to **Settings** > **Integrations** and configure your Google Workspace connection.
When creating access levels in applications, select the corresponding Google Group from the dropdown menu.
In your access request workflows, add Google Workspace actions after approval to automatically provision access.
Learn about [Google Workspace integration](/integrations/google-workspace/overview) and automated provisioning
See the [Setting up access requests](/guides/how-to/setting-up-access-requests) guide for step-by-step instructions on building complete access request workflows
## Mental model
An application in Ravenna represents an external tool or service that your organization uses (e.g., GitHub, Salesforce, AWS). Each application has one or more **access levels** that define the permission tiers users can request (e.g., Admin, Editor, Viewer).
Applications are the access catalog. They answer the question: "What can users request access to, and at what permission level?"
Key relationships:
* One organization has many applications.
* One application has many access levels.
* Each access level can map to an identity provider group (Okta group, Google Group) for automated provisioning.
* Each access level has an assignment strategy that controls how approvers are assigned.
* Applications are organization-scoped but can be made visible in specific workspaces.
Applications can be created manually or synced automatically from identity providers (Okta, Google Workspace, Microsoft Entra ID). Synced applications stay in sync with the IdP but can have custom display names.
***
## Access level design guidance
**When to create separate access levels:**
* The application has distinct permission tiers that require different approval processes (e.g., Viewer vs Admin).
* Different groups of people should approve different permission levels.
* You need to track which permission level was granted for audit purposes.
**When a single access level is sufficient:**
* The application has a single permission model (you either have access or you do not).
* All access requests go through the same approval process regardless of what the user needs.
**Naming patterns:**
* Use names that match how your organization talks about permissions: "Admin", "Editor", "Viewer", "Member".
* Include the scope if the application has multiple contexts: "Repo Admin", "Org Member", "Billing Admin".
* Avoid generic names like "Level 1" or "Tier A" that do not communicate what access is granted.
***
## Assignment strategy selection
Each access level has an assignment strategy that controls how approvers are assigned to access request tickets.
| Strategy | Approvers assigned | Approval required from | Best for |
| --------------- | ------------------------ | -------------------------- | ----------------------------------------------------------- |
| **Auto** | System bot (automatic) | None, approved immediately | Low-risk apps, dev/test environments, self-service tools |
| **All** | All configured approvers | Any one approver | Multiple qualified approvers, fastest response time needed |
| **Round Robin** | One approver (rotated) | The assigned approver | Balancing workload, avoiding bottlenecks, fair distribution |
You can configure different strategies for different access levels within the same application. Common pattern: use "Auto" for basic Member access and "All" or "Round Robin" for Admin access.
***
## Identity provider integration patterns
Access levels can map to IdP groups for automated provisioning after approval.
**Okta:**
* Map each access level to an Okta group.
* After approval, use the "Add Users to Group" or "Add Users to Application" workflow actions.
* Okta group membership can then grant application access via Okta's assignment rules.
**Google Workspace:**
* Map each access level to a Google Group.
* After approval, use the "Add Users to Group" workflow action.
* Google Group membership can then grant access to Google Workspace apps, shared drives, and other resources.
**Without IdP integration:**
* Access levels still work for approval routing and audit trails.
* Provisioning must be done manually after approval (e.g., an assignee manually adds the user to the application).
***
## Applications in automation
**Forms:** Use the "Application select" and "Access level select" custom field types in forms. These fields connect directly to the application catalog and allow users to select which application and permission level they need.
**Workflows:** Access form field data (application, access level) as dynamic values in workflow actions. Common pattern: use conditional logic to branch based on the selected application or access level, then route to the appropriate approvers and provisioning actions.
When a workflow step references an application, you can filter the application list by:
* **Source**: The integration the application is synced from (for example, Okta, Google Workspace, Microsoft Entra ID), or Ravenna for applications created directly in Ravenna. Use this to scope a step to applications from a single identity provider.
* **Provisioning method**: How access to the application is provisioned (for example, group-based or manual). Use this to branch workflows between automated and manual provisioning paths.
* **Owner**: The application owner. Use this to route steps to the team responsible for the application.
* **Approver**: The role-based approver configured on the application.
**Agent rules:** The agent can present access request forms during conversation. When a user says "I need access to GitHub," the agent can present the appropriate form pre-filled with the application. Reference forms with `@Form Name` in agent rules.
**Application owner:** Each application has an optional owner, which can be either a single user or a user group. This can be used in workflow conditions to route approval requests to the application owner automatically. When the owner is a group, every member of the group is resolved as an owner.
**Application approver:** Each application also has an optional approver, which can be either a single user or a user group. When an access level or approval template uses the **Application Approver** role-based approver, requests resolve to this user or to all members of the selected group. If you leave it empty, Ravenna falls back to the application owner. Configure the approver in **Settings** > **Applications** > select an application.
The owner and approver fields each accept either a user or a user group, but not both at the same time. Selecting one clears the other.
**Post provisioning message:** Each application has an optional rich text `postProvisioningMessage`. When set, it replaces Ravenna's default confirmation message on the ticket after access is fully or partially provisioned. Use it to share login URLs, onboarding docs, or follow-up steps specific to the application. It is not sent on rejection or failed provisioning.
***
## Constraints and gotchas
* Applications are organization-scoped. All workspaces in an organization share the same application catalog, but workspace visibility is configurable per application.
* Access levels are specific to one application. There is no shared or global access level concept.
* Synced applications (from Okta, Google Workspace, Microsoft Entra ID) maintain their original name for sync purposes. Custom display names are cosmetic only and do not affect integration behavior.
* Applications have an **Active** or **Archived** status. Archived applications are hidden from request forms and the applications table by default; surface them by adding a status filter for Archived. Use bulk archive and bulk unarchive from the applications table, or the **Archive** and **Unarchive** actions on the application details page, to manage status.
* While an application is archived, Ravenna rejects modifications to its access levels and access requests with an `APPLICATION_NOT_ACTIVE` error. This includes creating or unarchiving access levels, and submitting, approving, rejecting, or extending access requests. Unarchive the application before performing these operations.
* Applications can also be permanently deleted from the application details page using the **Delete** action. Deletion is irreversible and removes the application, its access levels, and its IdP mappings. Prefer archiving when historical records, approval history, or ticket references must be preserved.
* Access levels also have an **Active** or **Archived** status. Archived access levels are hidden from request forms but retain their approval history and identity provider mappings. Use bulk archive and bulk unarchive from the **Access Levels** tab to manage many at once.
* Archiving an application preserves its access levels, approval history, and identity provider mappings. It does not revoke any access already provisioned through it. Revoking previously granted access must be handled separately in the IdP.
* Deleting an application permanently removes it along with its access levels and IdP mappings. It does not revoke any previously provisioned access; revocation must be handled separately in the IdP.
* Assignment strategies are configured per access level, not per application. Different levels within the same application can have different approval workflows.
* The "Auto" assignment strategy approves immediately with no human review. Use it only for low-risk access where automatic approval is acceptable.
* Access level mappings to IdP groups require an active integration. If the integration is disconnected, the mapping still exists but provisioning actions will fail.
* Application details (rich text notes) appear in hover cards when users view applications in custom fields. Use this to provide context about what the application is and when to request it.
Applications represent the external tools and services your organization uses. By defining applications in Ravenna with their corresponding access levels, you create a structured catalog that supports automated access request workflows and maintains proper governance controls.
***
## What applications provide
Centralized inventory of tools and systems your organization uses
Different permission tiers for each application
Control who approves requests for each access level
Map access levels to groups in Okta or Google Workspace
***
## Setting up applications
Create application entries to represent the tools and services your organization uses.
Go to **Settings** > **Applications** in the left sidebar.
Click **Add Application** to create a new application entry.
Provide the application details:
* **Name**: Display name for the application
* **Domain**: The application's web domain (optional)
* **Details**: Rich text notes about the application (optional). These details appear in hover cards when users view the application in ticket custom fields.
* **Owner**: User or user group responsible for managing this application. Selecting a group lets the entire group act as the owner for routing and fallback purposes.
* **Approver**: User or user group responsible for approving access requests for this application. Used by access levels and approval templates that route to the "Application Approver" role. When a group is selected, every member of the group is treated as an approver. If no approver is set, the application owner is used as a fallback.
* **Post Provisioning Message**: Optional rich text message sent to the requester after access has been granted. See [Post provisioning message](#post-provisioning-message) for details.
* **Workspaces**: Select which workspaces can surface this application via request forms
Add access levels to define the different permission tiers available for this application.
Click **Save** to create the application.
If your organization uses Okta or Google Workspace, you can automatically sync applications instead of creating them manually. See the [Okta integration guide](/integrations/okta/overview) or [Google Workspace integration guide](/integrations/google-workspace/overview) to set up automatic application syncing.
***
## Customizing synced application names
Applications synced from identity providers (Okta, Google Workspace, Microsoft Entra ID) use the integration's application name by default. You can set a custom display name to make applications easier to identify for your users.
Go to **Settings** > **Applications** and select the synced application you want to rename.
Click the **Edit** button to open the application settings.
Enter your preferred name in the **Display Name** field. This overrides the integration name shown to users.
Click **Save** to apply the new display name.
When a display name is set:
* The application appears as **Display Name (Original Name)** throughout the platform
* The original integration name is preserved for reference and syncing
* Clearing the display name reverts to showing only the original name
The original application name remains unchanged and continues to sync with your identity provider. Only the display name shown to users is affected.
***
## Post provisioning message
Set a custom message that's sent to the requester on the ticket once their access has been provisioned. Use it to share login instructions, links to documentation, onboarding resources, or any other context specific to that application.
When set, the post provisioning message replaces the default confirmation text on the ticket for both fully provisioned and partially provisioned access requests. When left blank, Ravenna uses the default messages.
### When to use it
Point users to a single sign-on URL, account setup link, or first-time login steps
Direct users to internal guides, training videos, or runbooks for the application
Note any post-provisioning steps the requester needs to take, such as installing a client or accepting an invite email
Tell requesters who to reach out to with questions about the application
### Configure the message
Go to **Settings** > **Applications** and select the application you want to edit.
In the **Post Provisioning Message** field, enter the rich text message you want requesters to see after access is granted. You can include formatted text, links, and lists.
Click **Save** to apply your changes. The message is used for all future access requests against this application.
### Default messages
If no post provisioning message is configured, Ravenna posts one of the following on the ticket:
| Outcome | Default message |
| ---------------------------- | ------------------------------------------------------------------------------------------------------------------------- |
| Access fully provisioned | Your request has been approved and your access has been granted. |
| Access partially provisioned | Your request has been approved, and we skipped provisioning some or all entitlements that you may already have access to. |
The post provisioning message is sent only after access is successfully provisioned (or partially provisioned). It isn't sent when a request is rejected or when provisioning fails.
***
## Exporting applications
Export your application catalog to a CSV file for reporting, audits, or backup. The export mirrors the list you currently see in **Settings** > **Applications**, so any search, sort, or filter you apply is reflected in the file.
### When to export
Share a snapshot of your application catalog with auditors or security reviewers
Build reports outside Ravenna using spreadsheet or BI tooling
Review ownership, approvers, and access levels across applications in bulk
Keep an offline record of your catalog before large changes
### Export the catalog
Go to **Settings** > **Applications**.
Apply any search, sort, or filters you want included. Only the applications currently visible in the table are exported.
Click **Export** in the toolbar. The CSV downloads to your browser as `applications-export-.csv`.
### What's included
Each row in the CSV represents one application. The export resolves user, group, workspace, and access-level references to human-readable names.
| Column | Description |
| ----------------------- | ---------------------------------------------------------------------------------------- |
| **Name** | The application's name |
| **Display Name** | The custom display name, if set |
| **Domain** | The application's web domain |
| **Status** | `Active` or `Archived` |
| **Source** | The integration the application is synced from, or `Ravenna` if created manually |
| **Provisioning Method** | How access is provisioned for the application |
| **Owner** | The user or user group that owns the application |
| **Approver** | The user or user group that approves access requests, or the owner if no approver is set |
| **Workspaces** | Workspaces the application is surfaced in |
| **Access Levels** | Comma-separated list of access levels defined on the application |
| **Active Entitlements** | Count of currently provisioned entitlements |
| **Created At** | When the application was created |
| **Archived At** | When the application was archived, if applicable |
Exports are capped at 10,000 applications per file. Use filters to narrow the list if your catalog is larger than that.
***
## Archiving applications
Archive applications you no longer want users to request access to without losing their configuration or breaking historical tickets. Archived applications are hidden from request forms and the application catalog by default, but their access levels and approval history remain intact for audit purposes.
### When to archive
The application is being retired and you do not want new access requests
A new tool has replaced this one but you need to keep historical records
The application is only used during specific periods and should be hidden between cycles
The application was created in error or is no longer relevant to your catalog
### Archive an application
Go to **Settings** > **Applications** and select the application you want to archive.
Use the **Archive** action in the application's details to archive it. A confirmation appears before the application is archived.
You can also archive multiple applications at once. From **Settings** > **Applications**, select the applications you want to archive and use the **Archive** bulk action.
### Unarchive an application
From **Settings** > **Applications**, add a status filter for **Archived** to display archived applications. Archived applications are hidden by default.
Select the archived application you want to restore.
Use the **Unarchive** action to restore the application to active status.
To unarchive multiple applications at once, filter by **Archived** status, select the applications, and use the **Unarchive** bulk action.
### Status and visibility
| Status | Visible in request forms | Visible in applications table | Allowed transitions |
| ------------ | ------------------------ | ----------------------------------------------- | ------------------- |
| **Active** | Yes | Yes | Active -> Archived |
| **Archived** | No | Yes (hidden by default, requires status filter) | Archived -> Active |
A color-coded **Archived** badge appears on the application row so you can identify archived applications at a glance.
Archiving an application does not revoke any access that has already been provisioned through it. Archived applications stop appearing in new request forms, but existing tickets, access levels, and identity provider mappings are preserved. To revoke previously granted access, handle the deprovisioning separately in your identity provider.
While an application is archived, Ravenna blocks changes to its access levels and access requests. Creating or unarchiving access levels, and submitting, approving, rejecting, or extending access requests tied to an archived application all fail with an `APPLICATION_NOT_ACTIVE` error until the application is unarchived.
***
## Deleting applications
Delete an application when you want to permanently remove it from your catalog. Unlike archiving, deletion is irreversible and removes the application from Ravenna entirely.
Deletion is permanent and cannot be undone. If you need to keep historical records, audit trails, or the option to restore the application later, [archive it](#archiving-applications) instead.
### When to delete versus archive
The application was created in error, contains test data, or has no historical tickets or approvals you need to retain
The application is being retired but you want to preserve its access levels, approval history, and ticket references for audit purposes
### Delete an application
Go to **Settings** > **Applications** and select the application you want to delete.
Use the **Delete** action in the application's details. A confirmation dialog appears before the application is permanently removed.
Confirm the deletion to remove the application, its access levels, and its identity provider mappings from Ravenna.
Deleting an application does not revoke any access that has already been provisioned through it. To revoke previously granted access, handle the deprovisioning separately in your identity provider.
***
## Access levels
Access levels define the different permission tiers available within an application. Each access level represents a specific set of capabilities users can be granted.
### Why use access levels?
Access levels help organizations implement least-privilege access by allowing users to request only the permissions they need for their role. This reduces security risk while maintaining operational efficiency.
Define levels that match how your organization actually uses each application
Grant only the access users need for their specific role
Users select specific levels, reducing approval back-and-forth
Maintain clear records of what access each user has
### Managing access levels
Access levels have a dedicated **Access Levels** tab on the application details page. Click any row in the table to edit that access level inline.
### Creating access levels
Go to **Settings** > **Applications**, select an application, and open the **Access Levels** tab.
Click **Add Access Level** to create a new permission tier.
Provide:
* **Name**: Clear name indicating what this level grants (e.g., "Admin", "Editor", "Viewer")
* **Description**: Detailed explanation of what permissions this level includes
* **Assignment strategy**: How approvers are assigned when users request this level
* **Approvers**: Who can approve requests for this access level
If using an identity provider integration, map the access level to the corresponding user group for automated provisioning.
Learn about [user groups](/documentation/platform/groups) including synced groups from identity providers
### Example access level structure
Access levels should reflect how your organization actually uses each application. Here's an example for Slack:
| Access Level | Description |
| --------------- | ---------------------------------------------------- |
| Admin | Full admin capabilities including workspace settings |
| User Admin | User administration without workspace configuration |
| Channel Manager | Create, edit, delete, and manage channels |
| Member | Standard user without admin capabilities |
Structure access levels based on actual usage patterns in your organization, not theoretical permission models.
### Archiving access levels
Archive access levels you no longer want users to request without losing their configuration or breaking historical tickets. Archived access levels are hidden from request forms by default, but their approval history and identity provider mappings remain intact for audit purposes.
**When to archive an access level:**
* A permission tier has been deprecated but historical requests should be preserved
* You are restructuring an application's permissions and need to retire old levels
* A level was created in error and should be hidden from new requests
* A level only applies during specific periods and should be hidden between cycles
Go to **Settings** > **Applications**, select the application, and open the **Access Levels** tab.
Select the access level row and use the **Archive** action. To archive several at once, select multiple rows and use the **Archive** bulk action.
To restore archived access levels, filter the table by **Archived** status, select the access levels you want to restore, and use the **Unarchive** action. Use the **Unarchive** bulk action to restore many access levels in a single step.
Archiving an access level does not revoke access already granted through it. Existing tickets, approval history, and identity provider mappings are preserved. To revoke previously granted access, handle the deprovisioning separately in your identity provider.
***
## Assignment strategies
Assignment strategies control how approvers are assigned to access request tickets. Configure different strategies for different access levels based on risk and organizational requirements.
Automatically approves requests without human intervention. The system bot is assigned as the approver and the request is immediately approved.
**When to use:**
* Low-risk applications that don't require oversight
* Self-service applications with built-in approval mechanisms
* Testing or development environments
* Applications where immediate access is acceptable
**Behavior:**
* Request is approved immediately upon submission
* System bot is recorded as the approver
* No waiting period or manual review required
Assigns all specified approvers to the ticket. Any one of them can approve the request.
**When to use:**
* Multiple people are qualified to approve
* You want the fastest response from a pool of approvers
* Cross-functional teams where any member can approve
**Behavior:**
* All approvers in the list are assigned to the ticket
* Any single approver can approve the request
* First approval completes the approval step
Distributes approval requests evenly across the approver pool. Only one approver is assigned per request.
**When to use:**
* Balancing approval workload across team members
* Applications with multiple qualified approvers
* Avoiding bottlenecks from single points of approval
* Ensuring fair distribution of approval responsibilities
**Behavior:**
* Automatically tracks and rotates through approvers
* Assigns the next approver in the sequence
* Only one approver is assigned per request
* Ensures fair distribution across subsequent requests
Configure different assignment strategies for different access levels within the same application. For example, Admin access might use "All" to assign multiple approvers while Member access uses "Auto" for immediate approval.
***
## Identity provider integration
Map access levels to groups in your identity provider for automated provisioning after approval. When a workflow provisions access, it can automatically add users to the appropriate groups in Okta or Google Workspace.
### Okta
Connect your Okta integration and map access levels to Okta groups. After approval, workflows can automatically assign users to applications or add them to groups.
**How it works:**
1. In the Okta integration settings, connect your Okta organization
2. When creating an access level, select the corresponding Okta group from the dropdown
3. In your workflow, use Okta actions to provision access after approval:
* **Add Users to Application**: Directly assign users to Okta applications
* **Add Users to Group**: Add users to Okta groups that grant application access
**Configuration steps:**
Navigate to **Settings** > **Integrations** and configure your Okta connection.
When creating access levels in applications, select the corresponding Okta group from the dropdown menu.
In your access request workflows, add Okta actions after approval to automatically provision access.
Learn about [Okta integration](/integrations/okta/overview) and automated provisioning
### Google Workspace
Connect your Google Workspace integration and map access levels to Google Groups. After approval, workflows can automatically add users to the mapped groups.
**How it works:**
1. In the Google Workspace integration settings, connect your workspace
2. When creating an access level, select the corresponding Google Group from the dropdown
3. In your workflow, use Google Workspace actions to provision access after approval:
* **Add Users to Group**: Add users to Google Groups that grant application access
* **Create Email Alias**: Create email aliases for role-based access
**Configuration steps:**
Navigate to **Settings** > **Integrations** and configure your Google Workspace connection.
When creating access levels in applications, select the corresponding Google Group from the dropdown menu.
In your access request workflows, add Google Workspace actions after approval to automatically provision access.
Learn about [Google Workspace integration](/integrations/google-workspace/overview) and automated provisioning
See the [Setting up access requests](/guides/how-to/setting-up-access-requests) guide for step-by-step instructions on building complete access request workflows
## Mental model
An application in Ravenna represents an external tool or service that your organization uses (e.g., GitHub, Salesforce, AWS). Each application has one or more **access levels** that define the permission tiers users can request (e.g., Admin, Editor, Viewer).
Applications are the access catalog. They answer the question: "What can users request access to, and at what permission level?"
Key relationships:
* One organization has many applications.
* One application has many access levels.
* Each access level can map to an identity provider group (Okta group, Google Group) for automated provisioning.
* Each access level has an assignment strategy that controls how approvers are assigned.
* Applications are organization-scoped but can be made visible in specific workspaces.
Applications can be created manually or synced automatically from identity providers (Okta, Google Workspace, Microsoft Entra ID). Synced applications stay in sync with the IdP but can have custom display names.
***
## Access level design guidance
**When to create separate access levels:**
* The application has distinct permission tiers that require different approval processes (e.g., Viewer vs Admin).
* Different groups of people should approve different permission levels.
* You need to track which permission level was granted for audit purposes.
**When a single access level is sufficient:**
* The application has a single permission model (you either have access or you do not).
* All access requests go through the same approval process regardless of what the user needs.
**Naming patterns:**
* Use names that match how your organization talks about permissions: "Admin", "Editor", "Viewer", "Member".
* Include the scope if the application has multiple contexts: "Repo Admin", "Org Member", "Billing Admin".
* Avoid generic names like "Level 1" or "Tier A" that do not communicate what access is granted.
***
## Assignment strategy selection
Each access level has an assignment strategy that controls how approvers are assigned to access request tickets.
| Strategy | Approvers assigned | Approval required from | Best for |
| --------------- | ------------------------ | -------------------------- | ----------------------------------------------------------- |
| **Auto** | System bot (automatic) | None, approved immediately | Low-risk apps, dev/test environments, self-service tools |
| **All** | All configured approvers | Any one approver | Multiple qualified approvers, fastest response time needed |
| **Round Robin** | One approver (rotated) | The assigned approver | Balancing workload, avoiding bottlenecks, fair distribution |
You can configure different strategies for different access levels within the same application. Common pattern: use "Auto" for basic Member access and "All" or "Round Robin" for Admin access.
***
## Identity provider integration patterns
Access levels can map to IdP groups for automated provisioning after approval.
**Okta:**
* Map each access level to an Okta group.
* After approval, use the "Add Users to Group" or "Add Users to Application" workflow actions.
* Okta group membership can then grant application access via Okta's assignment rules.
**Google Workspace:**
* Map each access level to a Google Group.
* After approval, use the "Add Users to Group" workflow action.
* Google Group membership can then grant access to Google Workspace apps, shared drives, and other resources.
**Without IdP integration:**
* Access levels still work for approval routing and audit trails.
* Provisioning must be done manually after approval (e.g., an assignee manually adds the user to the application).
***
## Applications in automation
**Forms:** Use the "Application select" and "Access level select" custom field types in forms. These fields connect directly to the application catalog and allow users to select which application and permission level they need.
**Workflows:** Access form field data (application, access level) as dynamic values in workflow actions. Common pattern: use conditional logic to branch based on the selected application or access level, then route to the appropriate approvers and provisioning actions.
When a workflow step references an application, you can filter the application list by:
* **Source**: The integration the application is synced from (for example, Okta, Google Workspace, Microsoft Entra ID), or Ravenna for applications created directly in Ravenna. Use this to scope a step to applications from a single identity provider.
* **Provisioning method**: How access to the application is provisioned (for example, group-based or manual). Use this to branch workflows between automated and manual provisioning paths.
* **Owner**: The application owner. Use this to route steps to the team responsible for the application.
* **Approver**: The role-based approver configured on the application.
**Agent rules:** The agent can present access request forms during conversation. When a user says "I need access to GitHub," the agent can present the appropriate form pre-filled with the application. Reference forms with `@Form Name` in agent rules.
**Application owner:** Each application has an optional owner, which can be either a single user or a user group. This can be used in workflow conditions to route approval requests to the application owner automatically. When the owner is a group, every member of the group is resolved as an owner.
**Application approver:** Each application also has an optional approver, which can be either a single user or a user group. When an access level or approval template uses the **Application Approver** role-based approver, requests resolve to this user or to all members of the selected group. If you leave it empty, Ravenna falls back to the application owner. Configure the approver in **Settings** > **Applications** > select an application.
The owner and approver fields each accept either a user or a user group, but not both at the same time. Selecting one clears the other.
**Post provisioning message:** Each application has an optional rich text `postProvisioningMessage`. When set, it replaces Ravenna's default confirmation message on the ticket after access is fully or partially provisioned. Use it to share login URLs, onboarding docs, or follow-up steps specific to the application. It is not sent on rejection or failed provisioning.
***
## Constraints and gotchas
* Applications are organization-scoped. All workspaces in an organization share the same application catalog, but workspace visibility is configurable per application.
* Access levels are specific to one application. There is no shared or global access level concept.
* Synced applications (from Okta, Google Workspace, Microsoft Entra ID) maintain their original name for sync purposes. Custom display names are cosmetic only and do not affect integration behavior.
* Applications have an **Active** or **Archived** status. Archived applications are hidden from request forms and the applications table by default; surface them by adding a status filter for Archived. Use bulk archive and bulk unarchive from the applications table, or the **Archive** and **Unarchive** actions on the application details page, to manage status.
* While an application is archived, Ravenna rejects modifications to its access levels and access requests with an `APPLICATION_NOT_ACTIVE` error. This includes creating or unarchiving access levels, and submitting, approving, rejecting, or extending access requests. Unarchive the application before performing these operations.
* Applications can also be permanently deleted from the application details page using the **Delete** action. Deletion is irreversible and removes the application, its access levels, and its IdP mappings. Prefer archiving when historical records, approval history, or ticket references must be preserved.
* Access levels also have an **Active** or **Archived** status. Archived access levels are hidden from request forms but retain their approval history and identity provider mappings. Use bulk archive and bulk unarchive from the **Access Levels** tab to manage many at once.
* Archiving an application preserves its access levels, approval history, and identity provider mappings. It does not revoke any access already provisioned through it. Revoking previously granted access must be handled separately in the IdP.
* Deleting an application permanently removes it along with its access levels and IdP mappings. It does not revoke any previously provisioned access; revocation must be handled separately in the IdP.
* Assignment strategies are configured per access level, not per application. Different levels within the same application can have different approval workflows.
* The "Auto" assignment strategy approves immediately with no human review. Use it only for low-risk access where automatic approval is acceptable.
* Access level mappings to IdP groups require an active integration. If the integration is disconnected, the mapping still exists but provisioning actions will fail.
* Application details (rich text notes) appear in hover cards when users view applications in custom fields. Use this to provide context about what the application is and when to request it.